LINEAGE II · PRIMA GUIDE · 2004
Bounty Hunter & Warsmith guide
Read the original 2004 Prima Guide’s section on Bounty Hunter & Warsmith guide.
Bounty Hunter
(← Scavenger ← Dwarven Fighter)
Warsmith
(← Artisan ← Dwarven Fighter)
There are very few differences between Bounty Hunters and Warsmiths. Bounty Hunters get better Spoil skills and can Fake Death, while Warsmiths get better Crafting skills and can summon Golems and create crystals.
Think of Hammer Crush as an extended Stun. It has more power and a greater chance of working on higher level creatures. Note that, with the Chronicle 1 update, Stun was changed to last 9 seconds (instead of 6) but has a chance of being interrupted on hits.
Whirlwind, used with a polearm, hits each and every enemy around you in a 360¼ arc with 100% accuracy. You will use this skill constantly in sieges.
Whirlwind is the higher level version of Wild Sweep. There is a big difference between the two, though. Where Wild Sweep hit a target and the enemies around it in a fan, Whirlwind hits all surrounding enemies with no specific target. The bad news is, it doesn't work on people, even with the Ctrl key.
Bounty Hunter
Bounty Hunters are high-level Scavengers. They continue to progress to higher levels of Spoil and other masteries, but are identical in play style and role in a party or clan.
This is where things really pick up for you. Many C-grade and higher recipes, as well as many other items, can only be obtained with Spoil. For other things like enchantment scrolls, you will spoil them about ten times more often then they would drop otherwise (which still makes them rare, but at least gives you a better shot at them).
Fake Death allows you to fall over and play dead until the monster wonders off or you run out of MP. This is a lifesaver, but be aware that monsters will then immediately turn on the rest of your party.
During this time, you will be focused on gather materials for B-grade items for yourself and your clan. Your combat skills will continue to fall farther behind other classes. One "catch": once you have a B weapon you'll want B soulshots — good luck finding those! Get that C-grade Yaksa Mace to +3 and hold onto it.
Warsmith
There are few differences between Artisans and Warsmiths. The two classes are played in the same fashion and have almost the same skills.
Your new Summon Siege Golem skill summons a huge golem that does amazing damage on castle walls and doors, but very little damage on living targets. Impressive and massive, this golem costs a whopping 300 C-grade crystals and takes 5 minutes of non-interruption to cast. The golem can only be summoned during a siege.
HP / MP by level
Bounty Hunter · HP & MP by level
| Level | HP | MP |
|---|---|---|
| 41 | 1892 | 495 |
| 42 | 1985 | 521 |
| 43 | 2079 | 547 |
| 44 | 2174 | 573 |
| 45 | 2269 | 600 |
| 46 | 2366 | 626 |
| 47 | 2463 | 653 |
| 48 | 2560 | 680 |
| 49 | 2659 | 707 |
| 50 | 2758 | 734 |
| 51 | 2858 | 762 |
| 52 | 2958 | 789 |
| 53 | 3059 | 817 |
| 54 | 3161 | 845 |
| 55 | 3264 | 874 |
| 56 | 3367 | 902 |
| 57 | 3471 | 931 |
| 58 | 3576 | 960 |
| 59 | 3682 | 989 |
| 60 | 3788 | 1018 |
| 61 | 3895 | 1048 |
| 62 | 4002 | 1077 |
| 63 | 4111 | 1107 |
| 64 | 4220 | 1137 |
| 65 | 4329 | 1167 |
| 66 | 4440 | 1198 |
| 67 | 4551 | 1229 |
| 68 | 4663 | 1259 |
| 69 | 4776 | 1291 |
| 70 | 4889 | 1322 |
| 71 | 5003 | 1353 |
| 72 | 5118 | 1385 |
| 73 | 5233 | 1417 |
| 74 | 5349 | 1449 |
| 75 | 5466 | 1481 |
| 76 | 5584 | 1513 |
| 77 | 5702 | 1546 |
| 78 | 5821 | 1579 |
| 79 | 5941 | 1612 |
| 80 | 6062 | 1645 |
Warsmith · HP & MP by level
| Level | HP | MP |
|---|---|---|
| 41 | 1810 | 495 |
| 42 | 1899 | 521 |
| 43 | 1989 | 547 |
| 44 | 2079 | 573 |
| 45 | 2171 | 600 |
| 46 | 2262 | 626 |
| 47 | 2355 | 653 |
| 48 | 2448 | 680 |
| 49 | 2542 | 707 |
| 50 | 2637 | 734 |
| 51 | 2732 | 762 |
| 52 | 2828 | 789 |
| 53 | 2925 | 817 |
| 54 | 3022 | 845 |
| 55 | 3120 | 874 |
| 56 | 3218 | 902 |
| 57 | 3318 | 931 |
| 58 | 3418 | 960 |
| 59 | 3518 | 989 |
| 60 | 3620 | 1018 |
| 61 | 3722 | 1048 |
| 62 | 3825 | 1077 |
| 63 | 3928 | 1107 |
| 64 | 4032 | 1137 |
| 65 | 4137 | 1167 |
| 66 | 4242 | 1198 |
| 67 | 4349 | 1229 |
| 68 | 4455 | 1259 |
| 69 | 4563 | 1291 |
| 70 | 4671 | 1322 |
| 71 | 4780 | 1353 |
| 72 | 4890 | 1385 |
| 73 | 5000 | 1417 |
| 74 | 5111 | 1449 |
| 75 | 5222 | 1481 |
| 76 | 5334 | 1513 |
| 77 | 5447 | 1546 |
| 78 | 5561 | 1579 |
| 79 | 5675 | 1612 |
| 80 | 5790 | 1645 |
Collecting & crafting
Recipes are fairly common drops/spoils off of monsters, and remember, you don't have to collect them all! Keep one of every recipe you get as a drop, and if you find yourself trying to craft something that you don't have the recipe for, see if you can/want to hunt for it (check the Drop List in this book). If not, buy it from someone else!
Materials aren't as easy as recipes, just because of the sheer number that you need to collect. This is where clans/friends are really handy; if you have 10+ people looking for iron ore, you get a lot more iron in a lot less time. While it looks like you are spending a lot on materials, you will get a lot more back when you sell/use the item made.
You can also set up a Private Store to buy ingredients. As a Dwarf, you can offer to buy up to five different items. As long as you set a fair price (usually, something a bit above what an NPC vendor would pay — the vendor prices are listed in this guide for all items in the "Pays" column) and have patience, you're likely to get what you want.
Unfortunately, when this guide went to press, you were still unable to use the wish list to select any item to buy. Until that list appears, you have to have at least one of any item you want to buy. There's a least one work-around (other than constant chat shouts, which can get real obnoxious real fast) — set up a Private Store, and then list in your message what you want to buy that you don't have.
Some players will insist that you pay them close to full store selling price (not buying price). Of course, you don't have to do business with those players. Other players will be happy to simply give you the materials they've picked up, out of the goodness of their heart or because they don't want to carry them around in inventory. In either case, be appropriately grateful.
If you're looking for an exceptionally rare drop, you might have more luck setting up a store near the mobs that carry it and offering to buy it, rather than trying to pick it up yourself. This is particularly true when the mob in question is orange or red to you. If it's very rare, expect to pay a premium price for the drop.
MP and time are the real buffers on heavy duty crafting. If you are trying to create a bunch of items that take 80 mana each to make, and you only have 300 mana, you will have to rest every 3 makes or so. A lot of Dwarves get robes because of this, but note that robes just give you more mana; they don't speed up your regeneration speed.
Never waste material crafting, especially crafting none-grade or D-grade items. You can buy those items at the NPC stores, but cannot buy the key materials.
Alternative approach: craft away, sell what you make, and use the extra cash to get better equipment. That can boost you faster into higher levels.
If you make a diligent effort to collect recipes, it won't be long before you're maxed out on your carrying capacity. Remember to take advantage of warehouses for storage of more infrequently used recipes. This guide lists every recipe's materials (so you don't have to liberate it from the warehouse just to review the ingredients), and you can simply check off the recipes you have on the Recipe List here.
Tyrant advice on page 103 says Chronicle 1 stun lasts 8 seconds. Dwarf advice on page 118 says 9 seconds, as do Soul Breaker rows on pages 380–382. The differing printed descriptions are retained; the guide does not reconcile them.
Sources and original pages
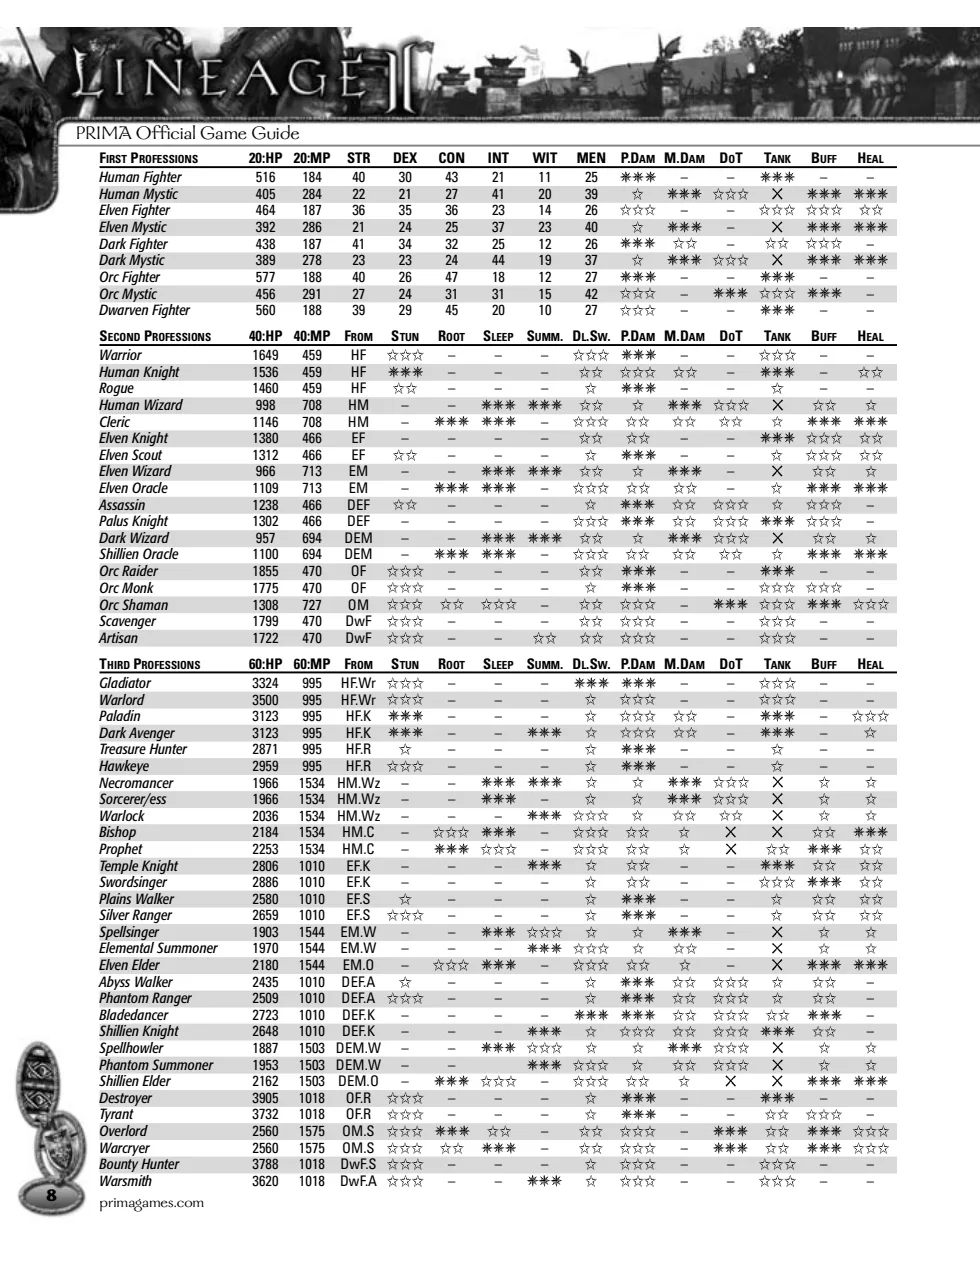
Printed class comparison
Bounty Hunter
Level 60
- HP
- 3788
- MP
- 1018
- Stun
- Good
- Root
- —
- Sleep
- —
- Summon
- —
- Dual swords
- Minimal
- Physical damage
- Good
- Magic damage
- —
- Damage over time
- —
- Tank
- Good
- Buff
- —
- Heal
- —
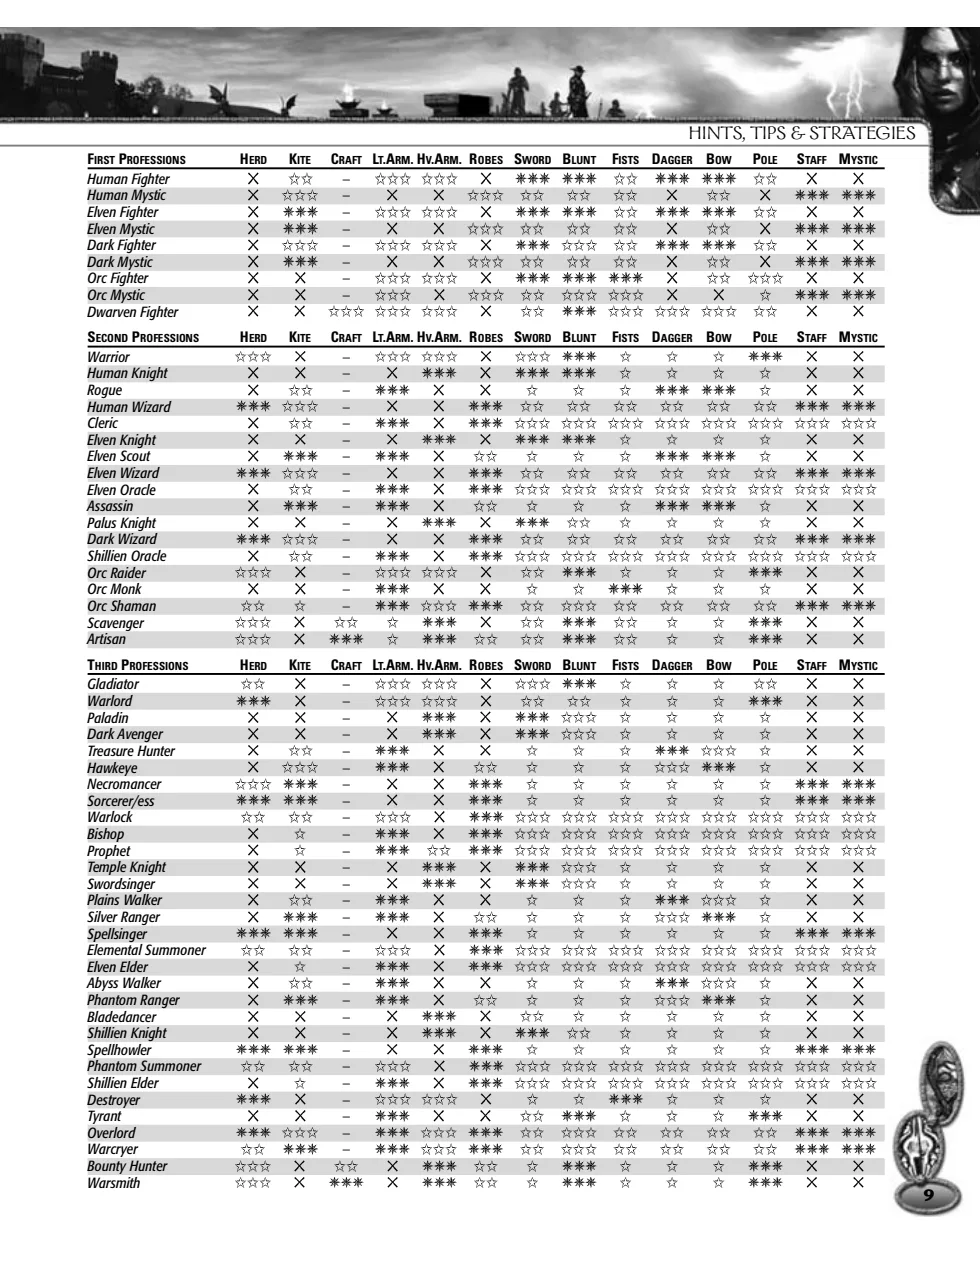
Level 60
- HP
- Not specified in the guide
- MP
- Not specified in the guide
- Herd
- Good
- Kite
- Avoid
- Craft
- Workable
- Light armor
- Avoid
- Heavy armor
- Excellent
- Robes
- Workable
- Sword
- Minimal
- Blunt
- Excellent
- Fists
- Minimal
- Dagger
- Minimal
- Bow
- Minimal
- Pole
- Excellent
- Staff
- Avoid
- Mystic
- Avoid
Warsmith
Level 60
- HP
- 3620
- MP
- 1018
- Stun
- Good
- Root
- —
- Sleep
- —
- Summon
- Excellent
- Dual swords
- Minimal
- Physical damage
- Good
- Magic damage
- —
- Damage over time
- —
- Tank
- Good
- Buff
- —
- Heal
- —
Level 60
- HP
- Not specified in the guide
- MP
- Not specified in the guide
- Herd
- Good
- Kite
- Avoid
- Craft
- Excellent
- Light armor
- Avoid
- Heavy armor
- Excellent
- Robes
- Workable
- Sword
- Minimal
- Blunt
- Excellent
- Fists
- Minimal
- Dagger
- Minimal
- Bow
- Minimal
- Pole
- Excellent
- Staff
- Avoid
- Mystic
- Avoid