LINEAGE II · PRIMA GUIDE · 2004
Cruma Tower hunting strategy
Plan group hunting by floor and room, with the guide’s advice on monsters, magic resistance, herding and sharing space in Cruma Tower.
Cruma (Kruma) Tower is a staple for group hunters. Its monsters give triple experience and drops; the area is dangerous but the drop possibilities are amazing. The scenery is breathtaking and the size and connectivity are overwhelming. It is a wonderful place for groups of three to nine; by the time you outlevel it you may be tired of it, but wealthy. For magic resistance, the guide urges a full Elven Set before visiting. Casters cast only once, but Krators can deal upwards of 200 damage even with that set.
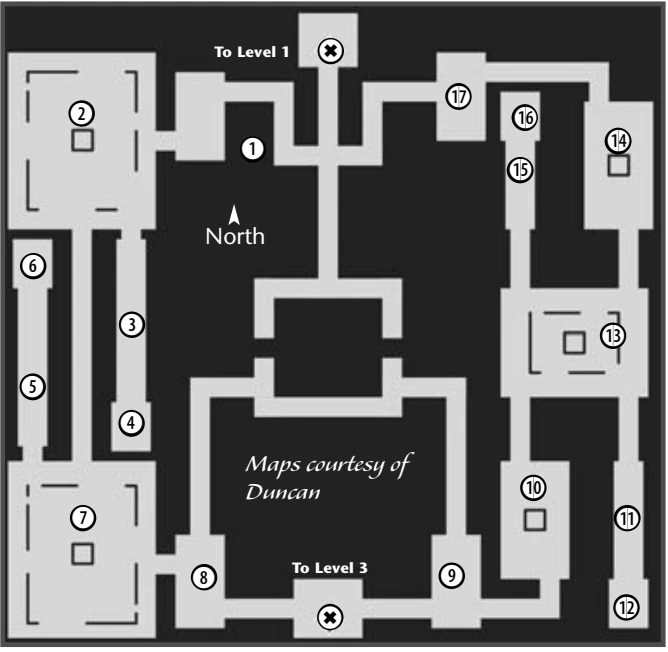
Floor 1 is dangerous but easy compared with higher floors. The first rooms have just one aggressive monster type, but it is a caster. The golem-rich area is good for escaping archers. Appropriate levels: 32–43 in groups. Nearest town: Dion. After entering, run south along the long passage and choose east or west. They initially look mirrored but differ in side rooms.
For Portas, Excuros and Krators, go west. If the first room is occupied, try the second, then the eastern counterparts if it too is occupied. For Mordeo, Krators and Ricenseo, the northwest corner of the second western room leads to a cross-shaped area; the eastern counterpart has a northeast door. For Krators and Premo, go east then southeast; some side rooms off the small hallway contain that golem pair. Landmarks: teleport towers.
Herding is a Wizard-type character hitting multiple monsters at once with an area spell. In Cruma, enter a room, hit each golem type once, then run in circles using your chosen area spell. Remember that one Mystic is occupying an entire room. You may be asked to take turns or give a party a chance; offering to team up is most polite. Excuros you are not targeting can still take splash damage, causing anyone who later kills them, even hours afterward, to lose EXP.
Monsters that help: Porta/Krator and Snipe/Snipe Cohort. Aggressive monsters: Krator and Snipe. Watch for Krator and Premo magic users. Snipes and their Cohorts, added in Chronicle 1, spawn as a group and can be a death trap for an unwary visitor; sleep, root and stun are useful against them.
Karma spots. Cruma Tower is crowded, so it is not ideal for reducing karma. However, it is so large that you have a good chance of hiding in a side room, especially early in the morning. A further benefit is that with karma, teleporting home sends you to Floran, one of the few towns without guards.
Floor 2. Twice as dangerous as Floor 1, Floor 2 of Cruma has monsters ranging from 45–50, many magical, aggressive or helping one another. Although there are a few safe rooms, the guide suggests at least two healers unless you have a Prophet. Appropriate levels: 43–50 in groups.
Good locations. You can again choose east or west, but the sides no longer mirror each other. On your first visit to Floor 2, start in the first room to the west. Draw the Torfes out, or the Validus will help them. After the Torfes, kill the Validus, then the Premo, and continue clearing the room. If that is not challenging enough, take the southwest door. Be very careful: that way has strong melee fighters and nasty spellcasters. Landmark: teleport tower.
Monsters that help: Torfe/Validus and Dark Lord/Dark Knight. Aggressive monsters: Torfe, Death Knight and Dark Lord. Watch for Torfe magic users. Dark Lords and their Knights, like the Snipe, can become very deadly very quickly. Dicor is one of the nastiest monsters in the game: it casts mass poison requiring Cure Poison 2 to cure. Avoid these toxic monsters if possible.
Karma spots. You still have the benefit of the Floran teleport, but solo hunting on Floor 2 is very dangerous. Hunting with a group while you have karma is also very dangerous unless they are close friends or clan members. Unless you are high level (50+), it is probably better to work off karma elsewhere.
Floor 3. If you came only for experience, turn back. The only reason to be on this floor is to hunt Core; other experience is poor and danger is high. Appropriate level: level does not matter — just be crazy.
Strategy. To reach Core, use either many people to kill and clear the doorway, or a very fast Elf to lure the monsters south, across the bridge south of the teleport cube and down the hole, then quickly teleport back up. Once the monsters are cleared, have a Rogue/Assassin/Scout type use Unlock on the door. The moment it opens, all monsters respawn; handle them as before or try running into the Core room.
Inside, either split into two teams, one fighting Core and one keeping the deathbladers away, or have everyone attack Core except the fast Elf, who kites the bladers. That Elf needs a dedicated healer because she cannot completely outrun all bladers. She could try taking them outside and down the hole as with the door guards. Group healers are essential: Core has a 200-damage area attack and all attackers need healing. All monsters are aggressive. Boss: Core. Never come here with karma.
Source counting discrepancies: page 3 describes fifty-nine classes and page 7 says there are 32 choices at Level 40. The comparison chart actually lists 31 third professions,18 second professions and 9 first professions, totaling 58. All printed statements and listed records are retained with this flag.
Source page-reference error: the contents on page 4 point to page 345 for Dark Fighter skills. The actual Dark Fighter skill table starts on page 348. Navigation uses the verified table location; the printed contents reference is preserved here.
Source page-reference error: the printed table of contents on page 5 points to page 247 for recipe ingredients; the actual recipe-ingredients section starts on page 274. The printed reference is preserved here; navigation should use the actual section.
Source arithmetic label error: page 12 calls the result of 270 XP divided by 3 hits "90 XP per kill". That calculation gives 90 XP per hit; the total per kill in the example is 270 XP. The printed wording is preserved with this note.
Conflicting source descriptions: page 24 says WIT influences Casting Speed, while page 26 prints its formula as 166.5 × [DEX bonus]. The guide does not reconcile these statements. Both printed statements are preserved; this website does not infer a corrected formula.
Conflicting source ranks: the Level 15 recommendations continued on page 33 print Weapon Mastery 2, while the Human Fighter skill table on page 286 lists Weapon Mastery 3 at Level 15 and Weapon Mastery 2 at Level 10. The printed advice and table values are preserved with this distinction.
Page 93 calls Orc Mystics the Mystics with the lowest DEX. The printed base-stat boxes give Orc Mystic DEX 24 (page 104), Human Mystic 21 (page 44), Dark Mystic 23 (page 86), and Elven Mystic 24 (page 66). The prose and values are preserved with this inconsistency noted.
Printed quest-reference difference: the Antharas’ Lair advice on page200 says “Audience with the Green Dragon”; the walkthrough heading on page156 says “Audience with the Land Dragon” and the index on page145 says “Audience w. the Land Dragon”. Each printed name is retained.
Printed spelling difference: the helping-monster list on page200 uses “Pytan/Pytan Knight”, while the aggressive-monster list uses “Ptyan”. These spellings are retained without silently treating them as an identical record.
The printed guide lists Mechanic Golem (4) at Level 57 and Mechanic Golem (5) at Level 51. These values are preserved exactly; the unusual rank/level ordering is a source inconsistency, not a correction made by this website.
The printed guide lists Viper Cubic (2) with M.Atk 544 and poison power 5, followed by Viper Cubic (1) with M.Atk 791 and poison power 6. The original labels and values are preserved; their reversed ordering is flagged rather than silently corrected.
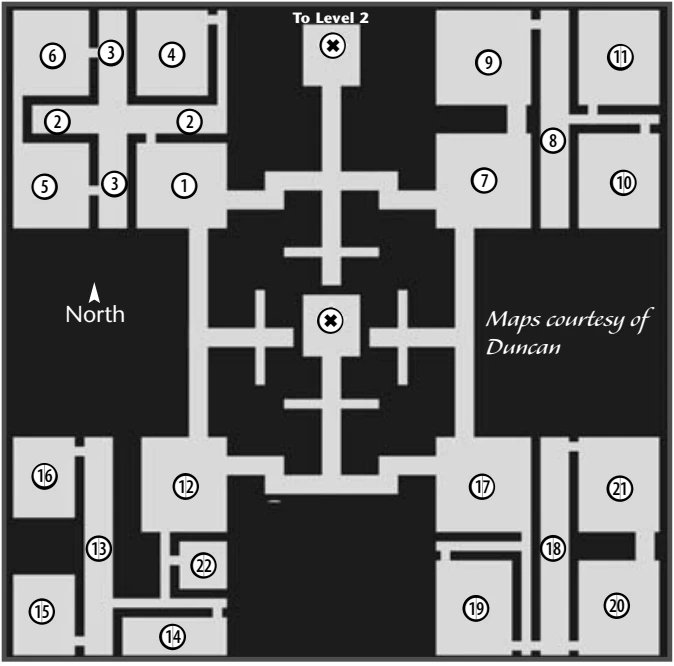
Cruma Tower — Floor 2