LINEAGE II · PRIMA GUIDE · 2004
Travel and the world map
Use the original world maps and map keys, then read the guide’s practical advice on finding your way and managing travel costs.
When it comes to getting from one point to another in the world, it helps to have a guide. While continent and city maps can be acquired from traders for a small price, this chapter provides other maps you can't get in the game — including plenty of dungeons, a restart location map and a teleport map.
Map keys
Not all town maps include all types of shops and other NPCs, but when you see the following keys on a map, here or in the starting villages, they each mean something specific:
| Key | Meaning |
|---|---|
| G | New Player Guide |
| J | Jewelry Vendor |
| M | Magic Vendor |
| P | Pet Manager |
| S | Smithy (Blacksmith) |
| T | Teleport (Gatekeeper) |
| W | Warehouse |
| X | Weapons & Armor |
Traveling tips
Your first step in the game should be to complete the map quest so that you'll be able to find your way around your local area. As you move into other towns, you can acquire maps for those areas as well.
Traveling is expensive at lower levels, and it usually costs more to get back home than it does to leave in the first place.
You can jump off of a ship or swim from shore and then use Escape Scrolls to restart in a different region (see map on p. 178). If you can increase your ability to survive underwater, this can be a relatively inexpensive way to travel.
Ship travel is slow, but it gets you there. Make sure you buy the right color ship ticket from the wharf manager. If you buy the wrong ticket, you'll just teleport back to where you started.
In most cases, you shouldn't strike out for new cities until your first profession quest. Many areas are meant for higher-level characters, and you don't want to die poor and alone in a strange place. Plus, you may not be able to find trainers in all cities.
Some roads (but not all) are safe to run along. Keep in mind that taking off-road shortcuts can attract a train of aggressive enemies if you get too close to them!
World map key
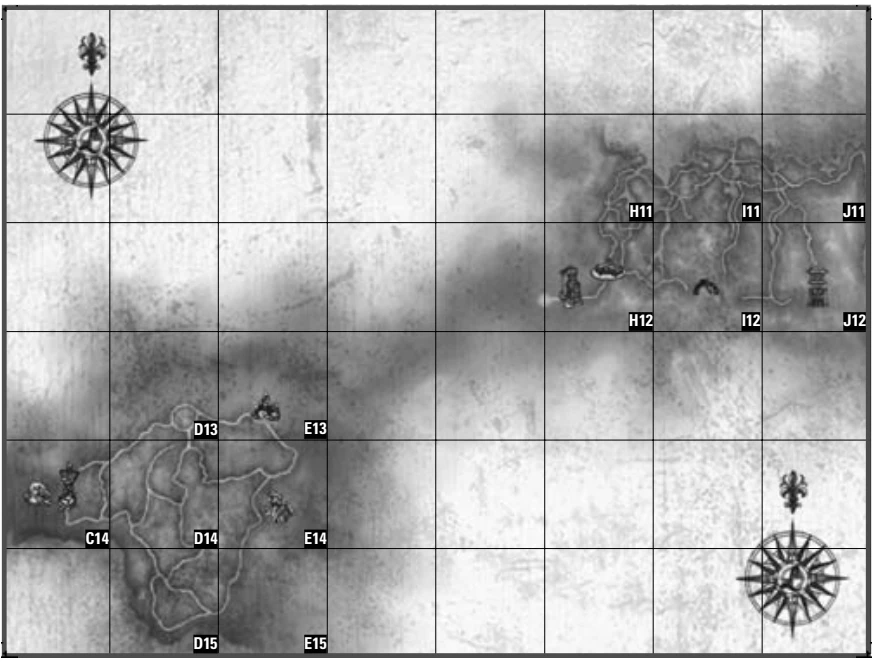
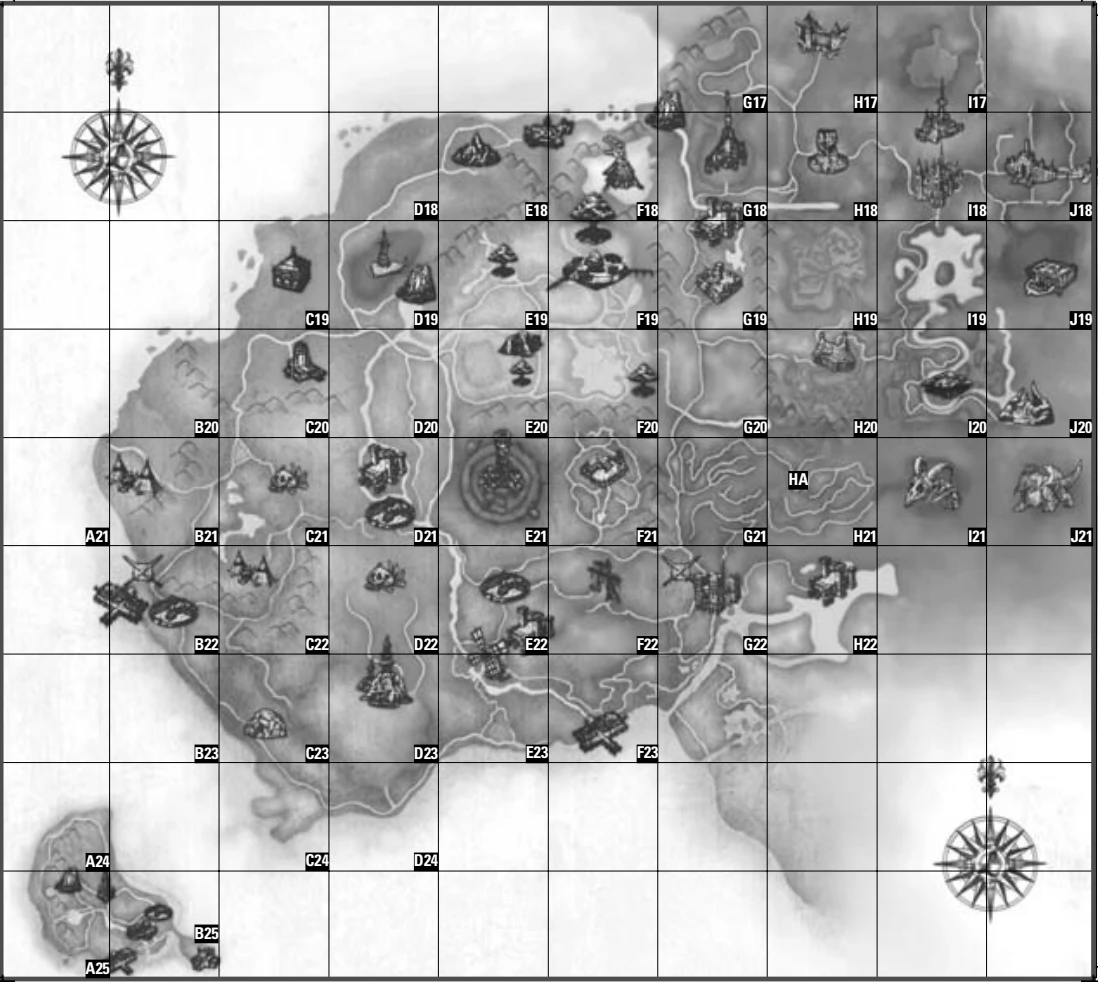
Key letters identify part of a zone, such as Central or North, when a zone has more than one key feature. Only zones active in Chronicle 1 have a grid identification. A few listed features are not currently accessible and are marked with an asterisk (*).
The grid-box labels also roughly identify creature locations. Every creature has one or more locations in the Creatures chapter, specifying a grid box or dungeon.
| Location | Grid |
|---|---|
| Abandoned Camp | C22 |
| Abandoned Coal Mines (Dw Dn) | I12 |
| Aden Castle Town | I18 (S) |
| Aden Castle | I18 (N) |
| Altar of Rites | C20 |
| Anghel Waterfall | J20 |
| Ant Nest | D23 (N) |
| Antharas' Cave | J21 |
| Antharas' Lair | I21 |
| Blazing Swamp | I17 |
| Border Outpost | H17 |
| Cave of Trials (O Dn) | E14 |
| Cedric's Training Hall | B25 (SE) |
| Cemetery | J18 (W) |
| Cruma Tower | E21 |
| Dark Elven Village | E18 (N) |
| Death Pass | G21 (W) |
| Dion Castle Town | E22 (C) |
| Dion Castle | E22 (SE) |
| Dwarven Village | H12 (E) |
| Einhovant's School of Magic | B25 (S) |
| Elven Fortress (E Dn) | E20 |
| Elven Ruins (H Dn) | A25 (N) |
| Elven Village | F19 (C) |
| Enchanted Valley | H19 |
| Execution Ground | F22 |
| Fellmere Lake | C21 (SW) |
| Floran Village | E23 |
| Forbidden Gateway | J18 (E) |
| Forest of Mirrors | I20 |
| Forgotten Temple | C23 |
| Giants' Cave | J19 |
| Giran Castle Town | G22 |
| Giran Castle | H22 |
| Giran Harbor | F23 |
| Gludin Harbor | B22 (W) |
| Gludin Village | B22 (C) |
| Gludio Castle Town | D21 (S) |
| Gludio Castle | D21 (N) |
| Grim Ruins (Ruins of Agony) | C21 (C) |
| Hardin's Academy | H21 (HA) |
| Hunters' Village | H20 |
| Iris Lake | F20 |
| Ivory Tower | G18 |
| Mithril Mines (Dw Dn) | J12 |
| Mother Tree Glade | F19 (N) |
| Narsell Lake | I19 |
| Obelisk of Victory | A25 (NE) |
| Orc Barracks | B21 |
| Frozen Waterfall | E13 |
| Orc Village | C14 (E) |
| Oren Castle Town | G19 (S) |
| Oren Castle | G19 (N) |
| Partisan Hideaway | F21 |
| Ruins of Agony | C21 (C) |
| Ruins of Despair | D22 |
| Ruins of Sorrow (Agony) | C21 (C) |
| School of Dark Arts (DE Dn) | C19 |
| Sea of Spores | F18 |
| Strip Mine | H12 (W) |
| Swampland | D19 |
| Talking Island Harbor | B25 (SW) |
| Talking Island Village | B25 (C) |
| Temple of Paagrio | C14 (W) |
| Temple of Shilen | E18 (NE) |
| Tower of Insolence | H18 |
| Valley of Dragons | G21-H21 |
| Wasteland | C23-D23 |
| E14C14 | D14 |
Source counting discrepancies: page 3 describes fifty-nine classes and page 7 says there are 32 choices at Level 40. The comparison chart actually lists 31 third professions,18 second professions and 9 first professions, totaling 58. All printed statements and listed records are retained with this flag.
Source page-reference error: the contents on page 4 point to page 345 for Dark Fighter skills. The actual Dark Fighter skill table starts on page 348. Navigation uses the verified table location; the printed contents reference is preserved here.
Source page-reference error: the printed table of contents on page 5 points to page 247 for recipe ingredients; the actual recipe-ingredients section starts on page 274. The printed reference is preserved here; navigation should use the actual section.
Source arithmetic label error: page 12 calls the result of 270 XP divided by 3 hits "90 XP per kill". That calculation gives 90 XP per hit; the total per kill in the example is 270 XP. The printed wording is preserved with this note.
Conflicting source descriptions: page 24 says WIT influences Casting Speed, while page 26 prints its formula as 166.5 × [DEX bonus]. The guide does not reconcile these statements. Both printed statements are preserved; this website does not infer a corrected formula.
Conflicting source ranks: the Level 15 recommendations continued on page 33 print Weapon Mastery 2, while the Human Fighter skill table on page 286 lists Weapon Mastery 3 at Level 15 and Weapon Mastery 2 at Level 10. The printed advice and table values are preserved with this distinction.
Page 93 calls Orc Mystics the Mystics with the lowest DEX. The printed base-stat boxes give Orc Mystic DEX 24 (page 104), Human Mystic 21 (page 44), Dark Mystic 23 (page 86), and Elven Mystic 24 (page 66). The prose and values are preserved with this inconsistency noted.
Printed quest-reference difference: the Antharas’ Lair advice on page200 says “Audience with the Green Dragon”; the walkthrough heading on page156 says “Audience with the Land Dragon” and the index on page145 says “Audience w. the Land Dragon”. Each printed name is retained.
Printed spelling difference: the helping-monster list on page200 uses “Pytan/Pytan Knight”, while the aggressive-monster list uses “Ptyan”. These spellings are retained without silently treating them as an identical record.
The printed guide lists Mechanic Golem (4) at Level 57 and Mechanic Golem (5) at Level 51. These values are preserved exactly; the unusual rank/level ordering is a source inconsistency, not a correction made by this website.
The printed guide lists Viper Cubic (2) with M.Atk 544 and poison power 5, followed by Viper Cubic (1) with M.Atk 791 and poison power 6. The original labels and values are preserved; their reversed ordering is flagged rather than silently corrected.
World map — northern regions